
Completing a Visit in the Field
The visit workflow is where the real work happens. It's the proof-of-service your client pays for: a documented walkthrough with photos, notes, and a signed completion record. Best of all, it runs right from a phone, so your tech can work a property from start to finish even with no cell signal.
Here's how a visit goes from "scheduled" to "done."
1. Open the visit
- Open Visits. The header shows quick stats for Overdue, Today, Tomorrow, and Upcoming, so it's easy to see what needs attention.
- Find the visit and tap Start Visit. A visit that's already underway shows Continue Visit instead.

2. Check in (or skip it)
GPS check-in is completely optional. When you start, you'll see a banner reminding you that you can complete the visit with or without it.

You have two choices:
- Check In & Start Visit: captures your location and a timestamp, then shows "Checked in" with the time and coordinates on the header.
- Skip Check-In & Start: skips location capture and notes that check-in was skipped.
Either way, you move straight into the checklist. Check-in is never required, and skips are recorded so there's a clear, honest record of what happened.
3. Work the checklist
The checklist is grouped into categories, sub-categories, and items, all expanded and ready. A Progress card keeps a running tally of Total, Completed, Flagged, and Remaining. Tap "Remaining" to jump to the first item you haven't marked yet.
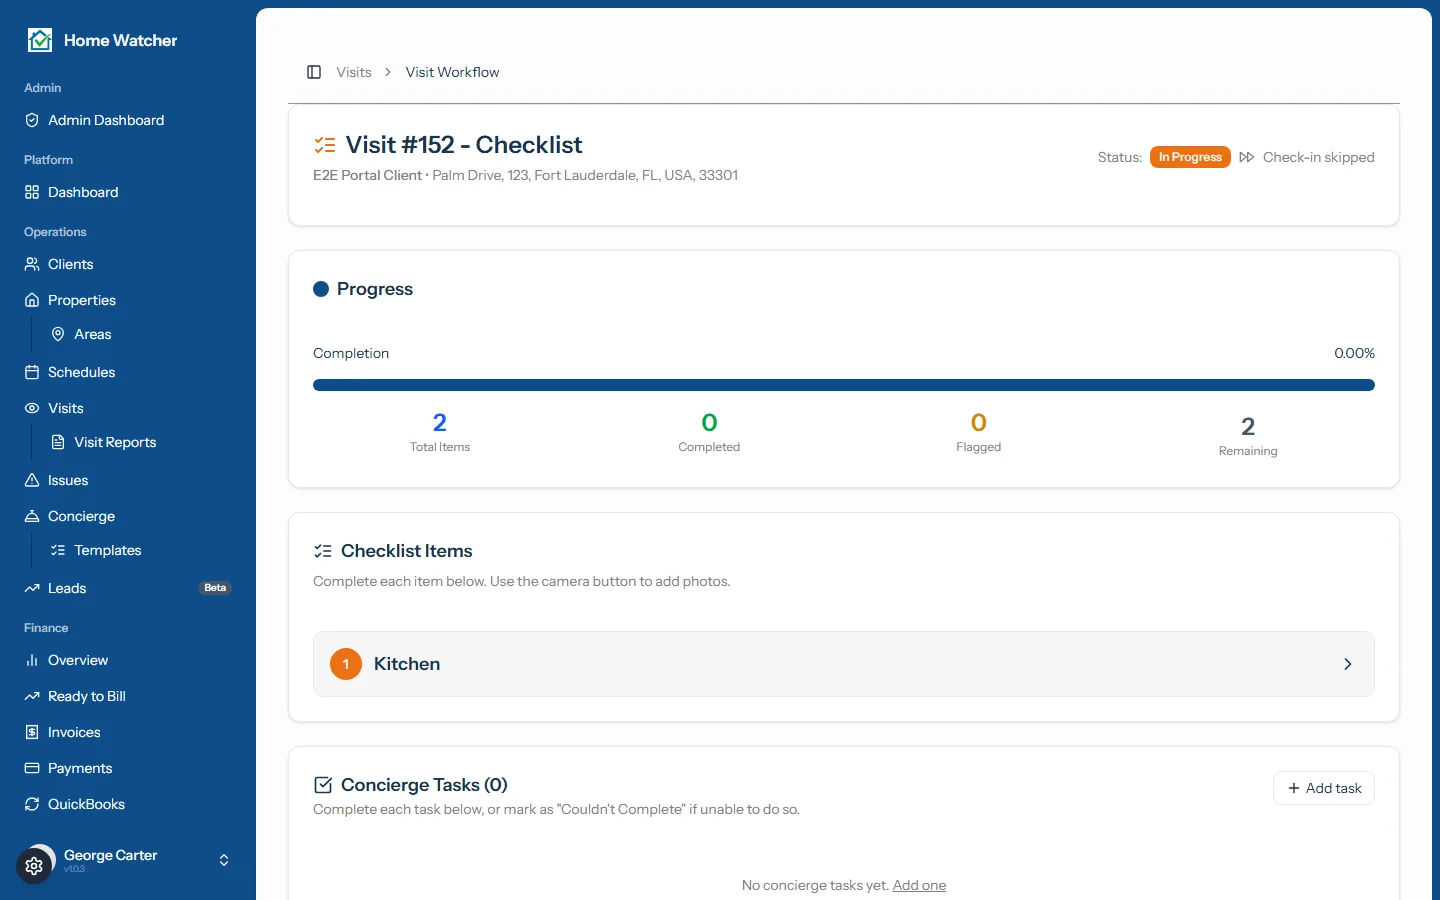
For each item:
- Mark it with one of three choices: Pass / Fail / N/A or Yes / No / N/A, depending on how the item was set up.
- Add a note if there's something worth recording.
- Attach a photo. On a phone, the camera opens directly; on a computer, you'll pick a file.
When you mark an item negative (Fail or No), it's automatically flagged. Flagged items need a note before you can finish, and the app will point you to anything missing one. Your progress autosaves as you go, so you never lose work, even offline.
4. Handle concierge tasks
If the visit includes concierge add-ons (like running the faucets or collecting mail), they appear in their own card. Toggle simple tasks done, check off steps on multi-step tasks, and add notes or photos. If something can't be done, use Couldn't Complete and enter a reason. For more on these, see our concierge services guide.
5. Review and complete
- Once every checklist item is marked and concierge tasks are handled, the Review Visit button unlocks. If anything's still blocking you, a "Before you can review" list spells it out.
- On the completion screen, add any Final Notes (optional) and your Provider Signature, which is required to finish. Sign with your finger on a phone or your mouse on a computer.
- Tap Complete Visit.

On completion, the app snapshots a polished Visit Report (checklist results, photos, notes, and signature) and automatically turns any flagged items into tracked issues. That report is what you send to the homeowner.
If your business uses the Summary + Details layout, the report opens with a one-page summary. AI drafts the paragraph at the top of it from your checklist answers and notes within seconds of completion, once the phone has a connection. Open the report to read or edit it. See the setup guide for AI report summaries.
Built for the field
The entire workflow is offline-first. Start, check-in, photos, notes, review, and completion all work without a connection and sync automatically when you're back online, so a property in a dead zone is no problem.
Ready to put it to work? Explore the full feature set or open the app at app.homewatchtools.com.
Written by
Mike
Mike is the founder of HomeWatchTools.com, dedicated to building simple, powerful software for the home watch industry.
Keep Reading
AI Home Watch Report Summaries Clients Actually Read
October 13, 2026
What goes on a one-page home watch report summary, how AI drafts it from your notes, what the AI never decides, and what homeowners see in the PDF, portal and texted link.
Don't Give Up: How Long It Really Takes to Get a Home Watch Business Off the Ground
October 13, 2026
Quiet early months are normal in home watch, and an uncertain economy can make them feel longer. A realistic first-year timeline, why the hard months pay off, and how to tell you're on track before your first client.
AI Report Summaries and Report Layouts
October 13, 2026
Put a one-page executive summary at the front of every report. Choose a layout, read and edit the AI-drafted summary, and pick the photos your clients see first.